APP INVENTOR TUTORIAL
EXAMPLE 6: TAKING PICTURES WITH CAMERA
The following tutorial will show how to create an app that makes and stores your pictures.
DESIGNER SECTION
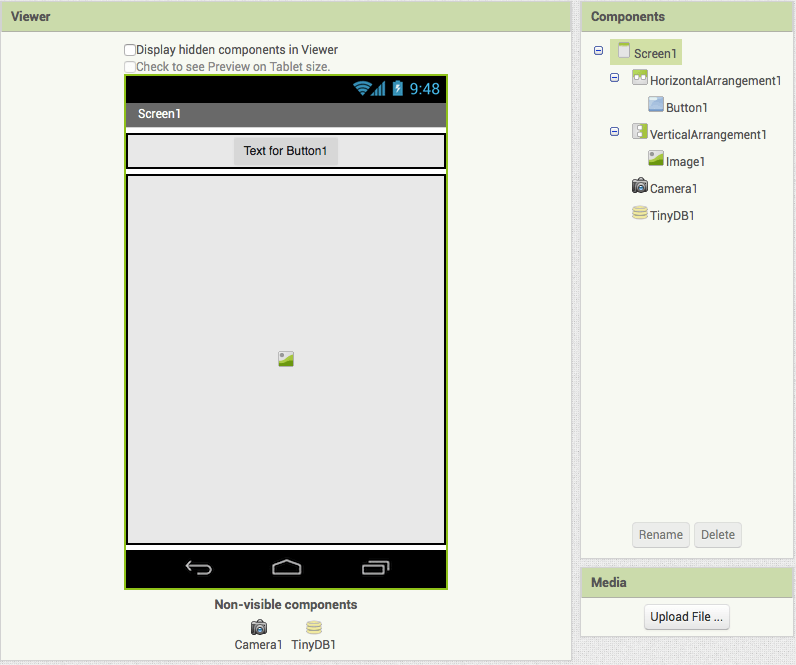
- Let’s add an HorizontalArrangement to Screen1 and change its alignment options to “center”.
- Add a Button to the Horizontal Arrangement and change its text to “Take a picture”.
- Now, add a VerticalArrangement and change the alignments options to “center”.
- We have now to add the object Camera, which has to open when the user clicks on “Take a picture”. Click on Media and add Camera.
- Then, we want the app to show the pictures we have just taken, just as the Gallery of your phone does. To do that in App Inventor, you have the TinyDB, which is a small database that allows your app to store and retrieve the data you have in your phone. Add the TinyDB from the Storage section to the VerticalArrangement. As you can see, both TinyDB and Camera are non-visible components.
- Now, we need to add an Image from Media, so that every picture you will take will be displayed as an image file.
BLOCKS SECTION
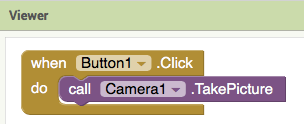
1. Add the code for the button. Every time the user clicks on “Take a picture”, the camera of your phone opens. Click on Button and add:
when Button1.Click
do
2. Now click on Camera and drag:
call Camera1.TakePicture
3. Let’s code the second part of our app. We want that after taking the picture, every picture is retrieved from the storage in our phone and showed in the app. First, we have to add the block that refers to the picture taken. Click on Camera and add:
when Camera1.AfterPicture
image
This block of code refers to the picture just taken by the Camera, it’s the code used to find the path to that image in your phone.
4. Now, for every image taken by the Camera, we want the TinyDB to store the images and name each new photo as “picture”. Click on TinyDB and add:
call TinyDB1.StoreValue

                    tag

           valueToStore
5. After “tag”, let’s add how we want to name each photo. As the value we are going to insert is a string, go to Text and add an empty block ” “. Then, change the text to “Picture”.
6. We have to specify what value we want to store, that is the picture just taken and saved in our phone. So, we need to call that picture by referring to the “Image” we have in the “when Camera1.AfterPicture” block. Image is therefore a variable. Click on the “Variables” section and add the following block:
get (select Image)
7. Now, do you remember that we added an “Image” to the VerticalArrangement, but we didn’t upload any file? We did that because we want that every new picture taken becomes the visible content of “Image”. How do we code that?
First, add the code to set your last picture as content of the Image. Click on Image and add:
set Image1.Picture to
8. What do we want to set as Picture? The value just stored in the TinyDB named “Picture”. So we have to retrieve the value stored under that given tag. Click on TinyDB and attach the following block to “set Image”:
call TinyDB1.GetValue

                  Tag

   valueIfTagNotThere
9. Just copy the previous string “picture” and attach it to “tag” and “valueIfTagNotThere”. “valueIfTagNotThere” is the code that allows the app to retrieve the last picture you took if you haven’t taken a new one yet.
Now, let’s run your app with Emulator and say cheese!
You can download the project here.


