FireBase: Authentication With google accounts
Firebase is a mobile and web application development platform that can bring to ours application different services and functionality, one of them is “Authentication”, providing us tools to the users to register in our app and use the accounts to verify a payment or save their progress and be able to load them later on.
So, now that we know what Firebase is, let’s learn how we can include it in our Android applications
How can you start to use Firebase?
In the first place before we can use the Authentication service we need to include Firebase in our apps. To do that, follow these steps:
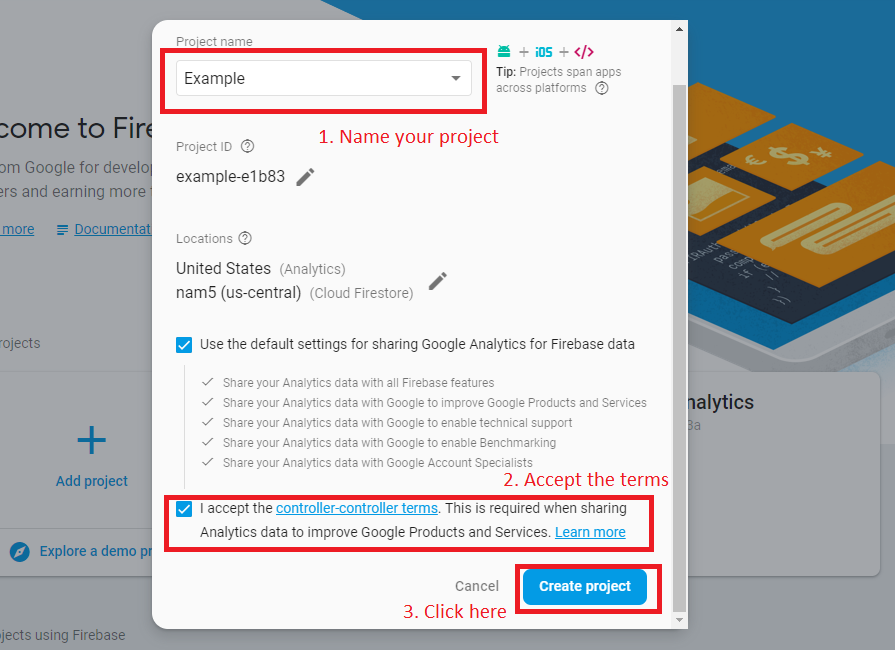
– First we need to get to the Firebase console and once we are there we click on “Add project”.
– Fill the following form to create your project.
– After that it will redirect you to your project’s overview page where we will specify the type of application we are creating. Because we are doing and Android you can select that option.
– After we click on it, it will give some steps to register our app. In the first will just need to some information about our application.
-For the next step, it will give us a JSON file which you can download and add to your “app” folder in your Android application.
-The next thing we have to do is add some lines to our build.gradle files:
. In your project “build.gradle” file, add this line:
 	 dependencies {
    		classpath 'com.google.gms:google-services:4.0.1'
  	 }
. In your app “build.gradle” file, add these lines:
  	dependencies {
           implementation 'com.google.firebase:firebase-core:16.0.8'
	}
	...
	// Add this at the bottom of the file
	apply plugin: 'com.google.gms.google-services'
After we add those lines to our Android project we will have FireBase setup and ready to be used in our app (The last step on the page is to verify that the app is connected to the Firebase console).
Implement firebase Authentication
Now that you have Firebase in your app let’s implement “Authentication” in our app:
– First you will need to go to the Firebase console and go to the Authentication section.
And there we will need to enable the Google option in this case, but you can enable the want that you prefer ( it may change the way to use that functionality in your apps).
-After you do that make sure in your app/build.gradle you have the following lines included in your dependencies:
implementation ‘com.google.firebase:firebase-auth:16.1.0’
implementation ‘com.google.android.gms:play-services-auth:9.2.0’
With this our project is ready now we just need to this the objects of this services. For that we will make a simple Sign-in button.
For that we will need to create the “Authentication” object.
We also created other objects like the “SignInButton”, that will help us to sign in, another button to allow us to sign out, an other objects that this example requires.
– Now we make to start our objects and for that we do it like this:
-We can create our functions to sign-in and sign-out.
To sign-in we create 3 functions, the first 2 makes the sing-in and the third change a “TextView” that we created to greet that person that signed-in:
To sign-out it simply call the functions to make the petition and then it changes the TextView:
With this, now when you click in the Sign-In Button, it will ask which of your Google account want to use and sign in and with the sign-out button it will sign you out unlinking your account to the app.
This is all for this post of Firebase Authentication, but there is more we can do with this service, for that, go to the Firebase official website, there you will find everything you can do with Firebase Authentication.


